Getting started with xShatter FX Simulation 2.0 (NEW)
Below is the table of content for each tab included in the xShatter FX Simulation window:
| General Settings Tab |
| Poly Shattering Generator Tab |
| Demolition Generator Tab |
| Directional Explosions Tab |
| Active Objects Tab |
| Optimization Tab |
| FX – Dust – Smoke Section |
| Troubleshooting Section |
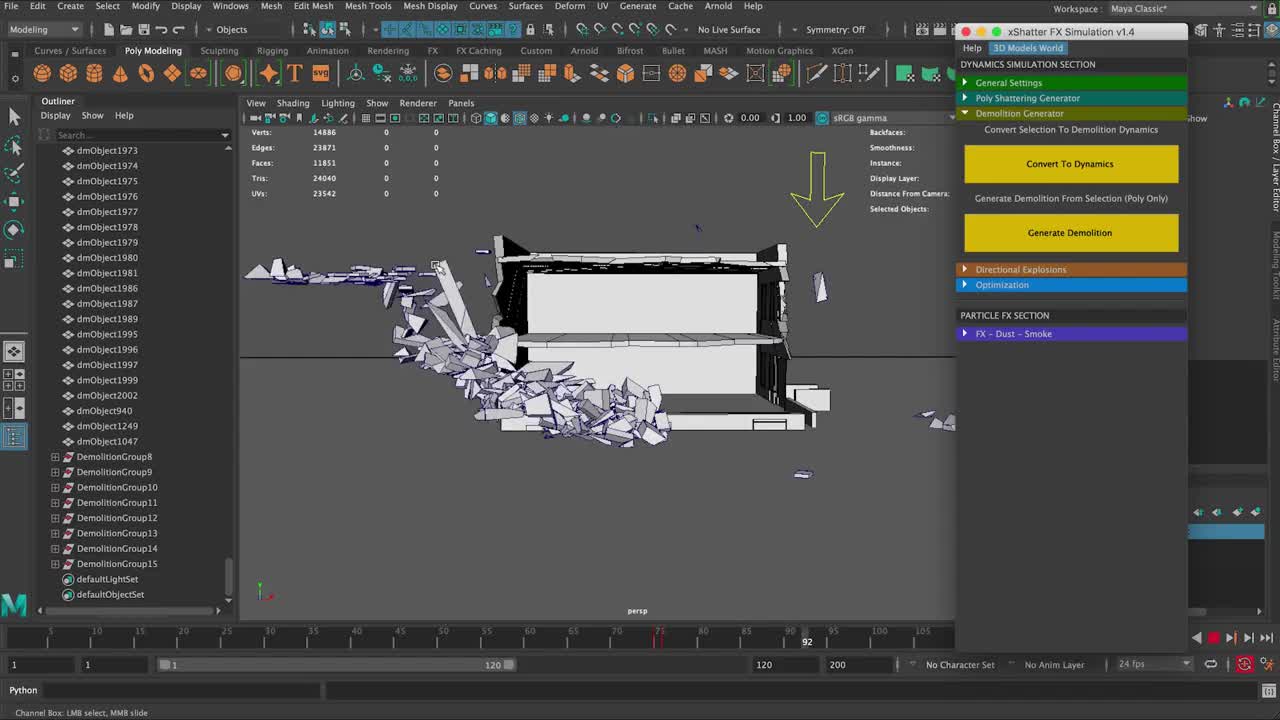
Please watch the video below for detailed overview of the xShatter FX Simulation by using it in action: (Note: This demo is for xShatter 1.4 but the same apply for xShatter 2.0) additional videos are below for new features.
Before Using xSHATTER FX Please Watch the 2 Videos Below
xShatter FX Simulation Tool is built on and compatible with Bullet Physics and nParticles for Maya, having Bullet Physics plugin activated is very important in order to have the Tool work properly.
1- Activating The Bullet Plugin: (Bullet Plugin must be Activated in order for xShatter Fx to work)
2- Disable Maya Cached Playback: (for Maya 2019 and above)
xShatter FX Simulation comes with two main tabs or sections:
1- Dynamics Simulation Section: this section contains all the settings to create outstanding Demolition, Explosions dynamics simulation and variety of different effects, like earth cracking and some magical type effects all inside of Maya using Maya’s built in tools.
2- Particle FX Section: this section contains all the settings to create very cool and extremely fast dust and smoke FX based on Maya’s nParticles system.
Dynamics Simulation Section
dynamics simulation system, is the place where you can create stunning dynamic simulation, from demolition sims to magic effects and much more, I will go in details for each tab in this section so lets get started!.
General Settings Tab
This tab includes very important buttons that you will be using often for your dynamic simulations.
1- Add Static Colliders: this button will create a static collider on (poly) selection, the default shape of the collider will be a box collider, but you can easily change the shape of the collider from the settings on the object it self, this collider is a Bullet Physics collider.
2- Fix Objects: this button will fix jumpy objects or objects that is behaving in un-natural way. if it didn’t fix the issue then its recommended to remove the sim on the object and re-apply again.
3- Remove Sim: this button will remove the simulation from selection, make sure the selection is dynamic polygon objects.
4- Freeze Sim: this button will freeze the selected polygonal objects at the current frame. this will be very handy if you want to create destruction debris on the ground and have them as static objects, example like set dressing thousands of rocks or pieces on the ground, or space debris like astroid belt etc..
5- Delete Sim: this button will delete all simulation nodes from the scene, all dynamic properties and simulations will be removed.
Tip: it’s a good idea to delete simulation from the scene once you have baked all the dynamics as keyframes, so this way you no longer need to have the sim and this will speed up your scene a lot, cause its much easier for Maya to process keyframes than dynamics.
Poly Shattering Generator Tab
The Video Below will demo poly shattering generator 2.0 (in xShatter FX 2.0) if you have older version of xShatter (there will be no new materials, it will be the same material as the original mesh applied)
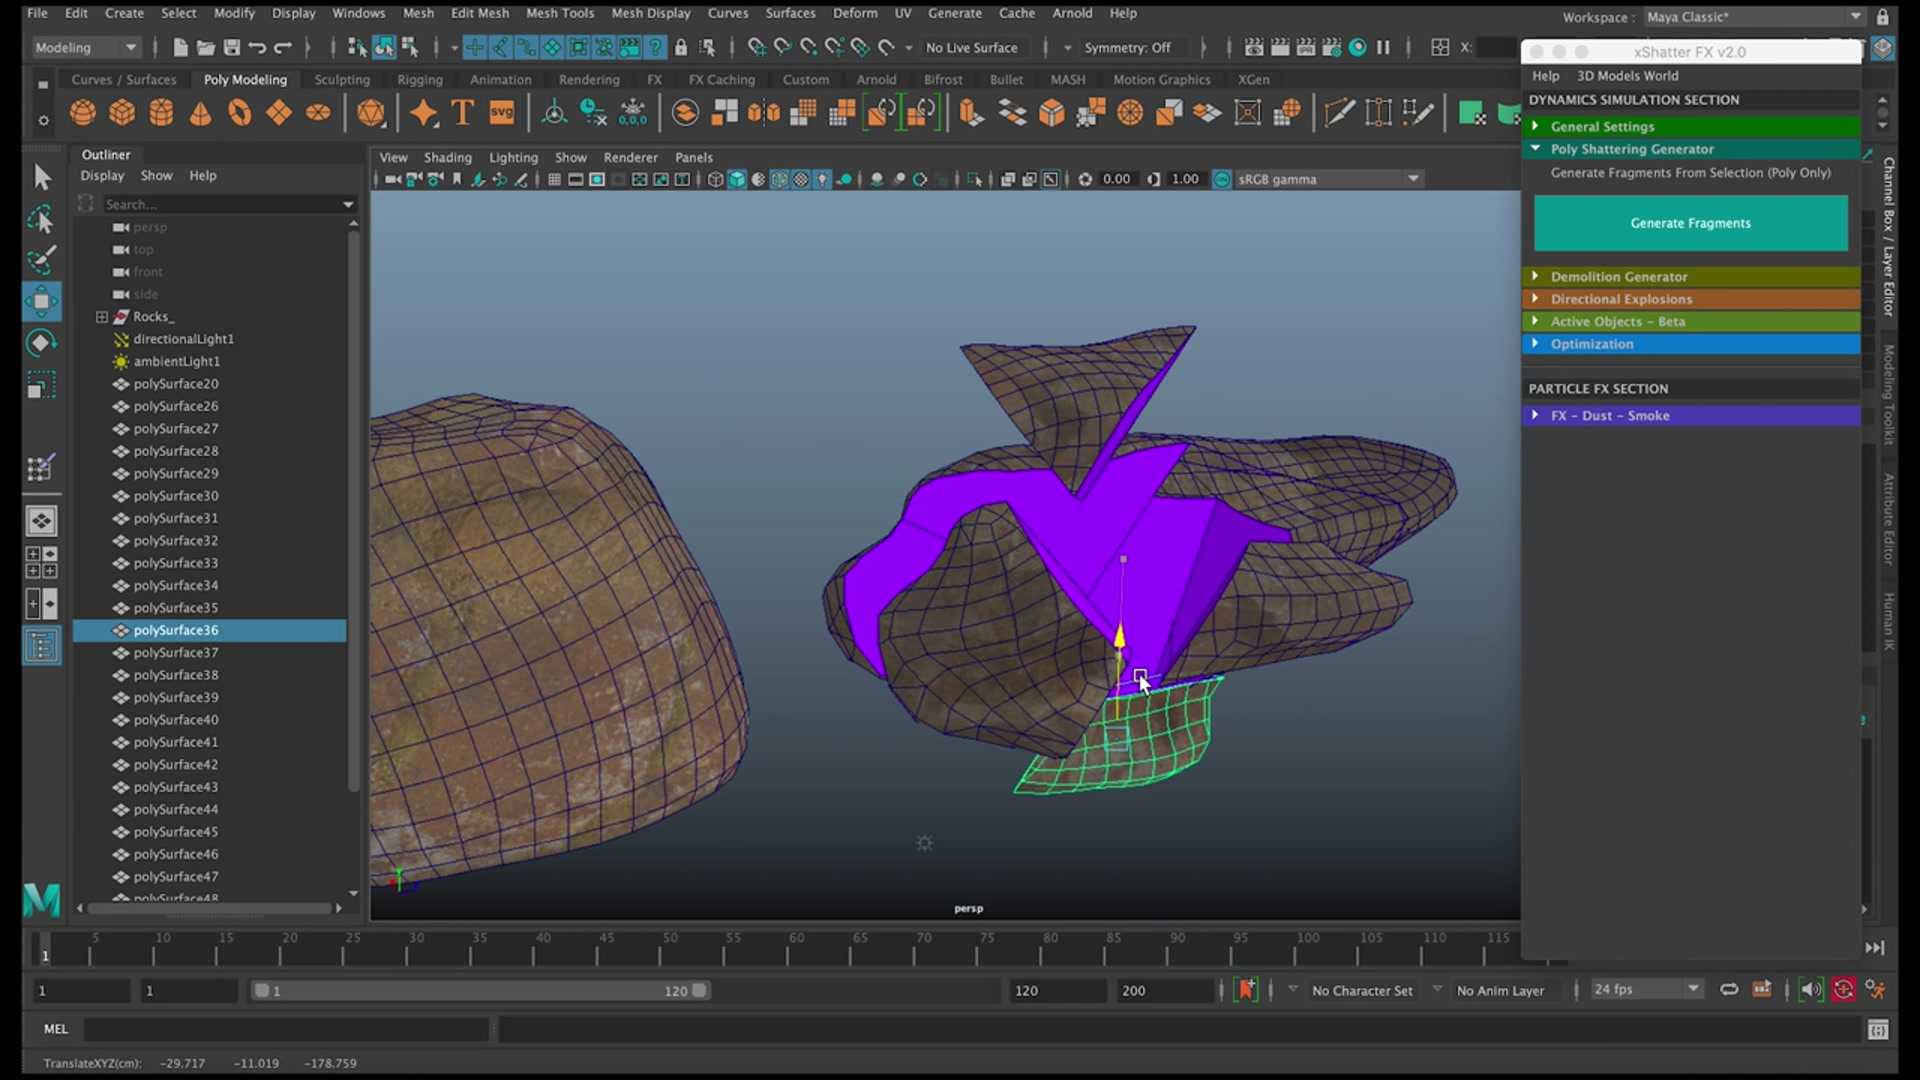
Generate Fragments: This button will generate shattering effect or fragments form selected polygon objects, its very important to have the object shattered before start applying the dynamics on it, the newly created objects or fragments will have uv’s and will inherit the same shader as the original object.
Currently it’s not recommended to select more than 200 objects at a time (depending on cpu power), the script might break.
Tip: If the script breaks and gives you this error (Error: line 78: polySurface has only one piece. Ignored.) then press undo around 2 times then select less objects and try again.
Demolition Generator Tab
1- Convert To Dynamics: this button will convert the polygon selections into dynamics with the proper settings for the demolition creation, however make sure once you clicked convert to dynamics that you do not de-select the polys cause if you de-select the polys and then clicked Generate Demolition the tool will not work cause it lost the dynamic selection.
Note: once you clicked Convert to Dynamics you might might get this Error: Failed to create evaluator for “drawdb/geometry/bulletRigidBodyShape” classification because the current drawing API isn’t supported.
This is bullet physics’ error and there is no need to worry about it. the tool will work regardless of this error and you will get the desired results.
2- Generate Demolition: this button will generate demolition simulation on the selected polygon objects. once you generate demolition on selection, you will have new nodes created in your scene.
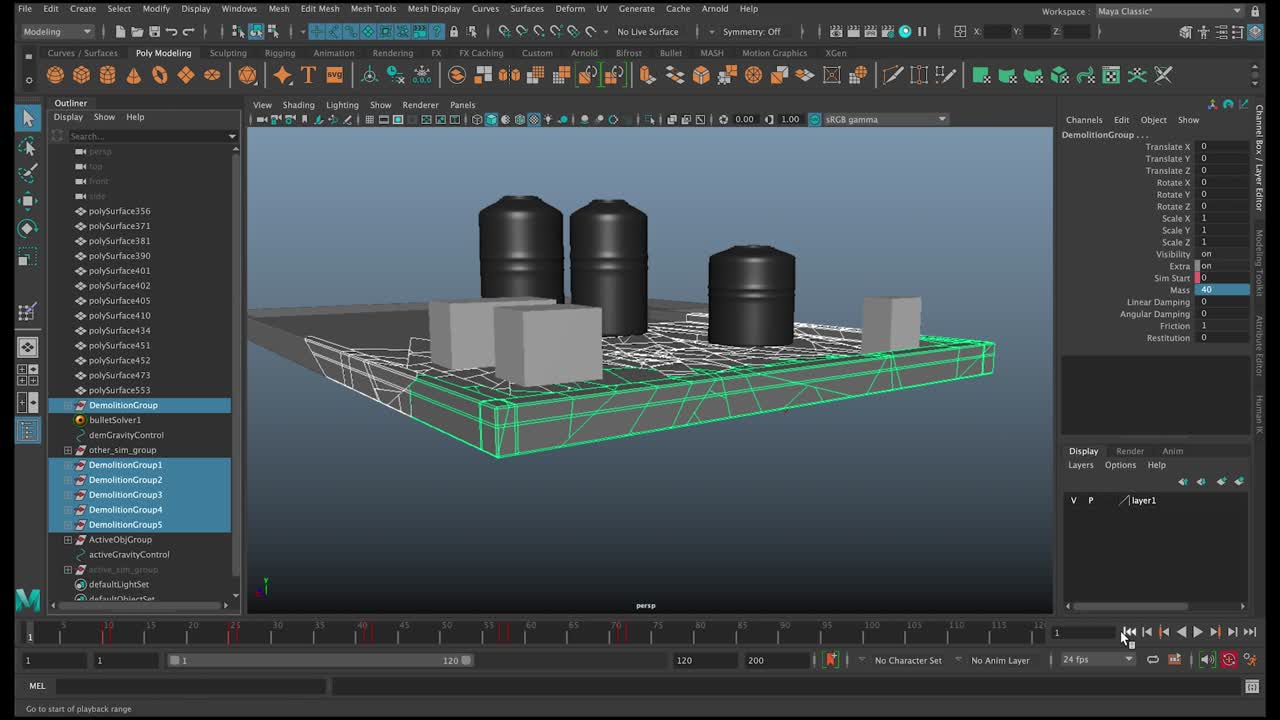
1- Demolition Group: this group will contain all the polygon dynamic objects, in the channel box of the group you will see under the visibility a set of attributes added to help you control the demolition simulation.
1.1 – Extra: this is a separator attribute, just for visual purpose only.
1.2 – Sim Start: this attribute will control the start of the simulation, currently is set to 0 which is off, you can choose any frame you want and then change it from 0 to 1 and key it, then your simulation will start.
Note: Sim Start: must be keyed to start the simulation. key Start Sim 0 at frame 1 then goto frame 2 then key Start Sim 1. this will start the simulation at frame 2.
Tip: if you want to the simulation start at frame 1 then you need to select the bullet solver and change the Start Time from 1 to 0 in the channel box.
1.3 – Mass: this attribute will control the weight of the dynamic objects the higher the number the heavier the objects will be, this is specially important when you have multiple dynamic objects interacting with each other, some objects like metal and concrete will have different mass, and this will effect their behaviour specially if they hit each other.
Optional: you don’t have to use real world mass on your objects in order for the dynamics to look correct, you can have some objects with Mass of 5 and others with Mass of 20 and this will be enough for the simulation to work well.
1.4 – Linear Damping: this attribute affect the the movement of the dynamic object, the default is 0 which mean the object will keep moving until they interact with other dynamic objects or until friction or other force stop them. increase the value to add slowing down to their movement over time.
1.5 – Angular Damping: this attribute is basically the same as the Linear Damping except it affects rotation and not translation.
1.6 – Friction: this attribute is basically the friction between two dynamics objects or more the max number is 1 which will give more realistic results, if it set to 0 then there will be no friction at all and dynamics will slide across the surface.
1.7 – Restitution: this attribute will affect the bounciness of the dynamic object higher number will result in more bouncy behaviour and lower number will result in less. default set to 0.
demGravityControl: this control will be created in the shape of yellow arrow in the centre of your scene in 0,0,0 location. this control have the attributes for the gravity that is applied to the demolition dynamic objects.
You can adjust the gravity in negative values to simulate a levitation type effect where the objects will fly upward toward the sky, or in a positive values to simulate a real world gravity, where the objects will fall down.
Directional Explosions Tab
1- Convert To Dynamics: this button will convert the polygon selections into dynamics with the proper settings for the directional explosion creation, however make sure once you clicked convert to dynamics that you do not de-select the polys cause if you de-select the polys and then clicked Generate Directional Explosion the tool will not work cause it lost the dynamic selection.
2- Generate Directional Explosion: this button will generate directional explosion simulation on the selected polygon objects.
DirectionalExploGroup: this group contains all the polygon objects that have been converted into directional explosion dynamics, this group is created for organization purpose. it does not contain any setting to control the dynamic behaviour.
Under this group you will find 2 additional objects created the first one is an arrow (ExploSimControl) and the second one is an ExploField.
1- ExploSimControl: this control have the main settings to control the dynamic objects, below is details for each setting.
1.1 – Direction Strength: if this value is set to 0 then the dynamics will not move in the arrow direction, the higher value this attribute have then the dynamic object will move more intensely and faster in the arrow direction.
this attribute is great to control the direction of the explosion you can simply rotate the arrow to anywhere you like and the dynamic objects will fly in the arrow direction, you can animate the strength of this attribute.
1.2 – Gravity: this attribute will control the gravity strength for only the objects under the group.
1.3 – Sim Start: this attribute have 0 or 1 and it will control the start of the simulation.
1.4 – Mass: this attribute will control the weight of the dynamic objects the higher the number the heavier the objects will be, this is specially important when you have multiple dynamic objects interacting with each other, some objects like metal and concrete will have different mass, and this will effect their behaviour specially if they hit each other.
1.5 – Linear Damping: this attribute affect the the movement of the dynamic object, the default is 0 which mean the object will keep moving until they interact with other dynamic objects or until friction or other force stop them. increase the value to add slowing down to their movement over time.
1.6 – Angular Damping: this attribute is basically the same as the Linear Damping except it affects rotation and not translation.
1.7 – Friction: this attribute is basically the friction between two dynamics objects or more the max number is 1 which will give more realistic results, if it set to 0 then there will be no friction at all and dynamics will slide across the surface.
1.8 – Restitution: this attribute will affect the bounciness of the dynamic object higher number will result in more bouncy behaviour and lower number will result in less. default set to 0.
1.9 – Rotation Y: you can rotate the arrow from 0 – 360 in both positive and negative values and the dynamics will fly in the direction of the arrow as long you have the Direction Strength activated.
2 – Explo Field: this control have the main settings to control the explosion behaviour on the dynamics. below is details of the settings and attributes.
2.1 – Magnitude: this attribute will control the strength of the explosion the higher the value the stronger the effect. the magnitude will be related to the scene scale, some scenes 1 is enough others 10000 or more will be enough, experiment and see which value will work for your scene.
2.2 – Volume Shape: this attribute will control the shape of the controller and each shape will give you a different result of the explosion, current shapes are: Cube, Sphere, Cylinder, Cone , Torus, Curve, None.
Feel free to experiment with each shape to achieve the desired look.
2.3 – Section Radius: this will control the shape which will affect the area influenced by the magnitude, this attribute mainly will work with the Torus shape.
2.4 – Turbulence: this will add like a noise type distortion into the explosion so you will get more random simulation of the flying debris. also it will make the explosion much more intense.
2.5 – Turbulence Speed: will affect the randomness of the turbulence, the higher the values the more randomly the objects will be flying in deferent directions.
2.6 – Turbulence Frequency X, Y, Z: this will affect the direction of the objects flying, this will work when the turbulence is turned on and have value on it.
2.7 – Detail Turbulence: this will affect the detail of turbulence distortion, lower value less detail or frequency and higher value more noise or frequency in the motion.
Active Objects Tab
The Video Below will Demo the Active Objects Tab: (This is only available in xShatter FX 2.0)
1- Convert To Dynamics: this button will convert the polygon selections into dynamics with the proper settings for the Active Objects creation, however make sure once you clicked convert to dynamics that you do not de-select the polys cause if you de-select the polys and then clicked Generate Active Objects the tool will not work cause it lost the dynamic selection.
Note: once you clicked Convert to Dynamics you might might get this Error: Failed to create evaluator for “drawdb/geometry/bulletRigidBodyShape” classification because the current drawing API isn’t supported.
This is bullet physics’ error and there is no need to worry about it. the tool will work regardless of this error and you will get the desired results.
2- Generate Active Objects: this button will generate active objects simulation on the selected polygon objects. once you generate dynamics on selection, you will have new nodes created in your scene.
1- ActiveObjGroup: this group will contain all the polygon dynamic objects, in the channel box of the group you will see under the visibility a set of attributes added to help you control the simulation.
1.1 – Extra: this is a separator attribute, just for visual purpose only.
1.2 – Mass: this attribute will control the weight of the dynamic objects the higher the number the heavier the objects will be, this is specially important when you have multiple dynamic objects interacting with each other, some objects like metal and concrete will have different mass, and this will effect their behaviour specially if they hit each other.
Optional: you don’t have to use real world mass on your objects in order for the dynamics to look correct, you can have some objects with Mass of 5 and others with Mass of 20 and this will be enough for the simulation to work well.
1.3 – Linear Damping: this attribute affect the the movement of the dynamic object, the default is 0 which mean the object will keep moving until they interact with other dynamic objects or until friction or other force stop them. increase the value to add slowing down to their movement over time.
1.4 – Angular Damping: this attribute is basically the same as the Linear Damping except it affects rotation and not translation.
1.5 – Friction: this attribute is basically the friction between two dynamics objects or more the max number is 1 which will give more realistic results, if it set to 0 then there will be no friction at all and dynamics will slide across the surface.
1.6 – Restitution: this attribute will affect the bounciness of the dynamic object higher number will result in more bouncy behaviour and lower number will result in less. default set to 0.
activeGravityControl: this control will be created in the shape of red brown, arrow. this control have the attributes for the gravity that is applied to the active objects.
You can adjust the gravity in negative values to simulate a levitation type effect where the objects will fly upward toward the sky, or in a positive values to simulate a real world gravity, where the objects will fall down.
Optimization Tab
1- Bounding Box: this button will convert selected polygons to bounding box shapes, this is recommended to use if your scene slows down and you want to generate quick preview of the object motion. if the selection is already in bounding box and you click this button again it will restore the objects to their original shape. this button affects any object in your scene include curves.
2- Bake Sim: this button will bake the simulation to keyframes on your selected objects, make sure to select only objects that have dynamic simulation on them otherwise the baking process will be not successful, if the button didn’t bake correctly from first time, press undo to get back the dynamics then de-select the objects and select them again and press bake sim.
This button will bake the simulation based on the selected time range of your timeline. (please adjust your timeline range accordingly).
FX – Dust – Smoke Section
In this section you can create dust and smoke for your dynamic simulations.
Tip: it’s very important to bake the simulation first and convert the dynamics into keyframe animation before you apply any dust or smoke.
1- Sprite Texture Images: this attribute will create an FX shader and attach it to the particles, also will control how many textures of pre-rendered smoke or dust will be applied to the particles.
The particles generated from this tool is a sprite base nParticles, so each sprite will have a unique image attached to it, for more realistic result above 100 textures is good.
Note: Once you purchase the tool you will have access to thousands of pre-rendered smoke in different colours and resolutions. each color have around 120 unique shape.
2- Generate Particle FX: this button will generate the particles from selected polygon objects. and create FXGroup that will have settings to control the particle FX behaviour.
3 – FXGroup: this group have all the polygon objects that have particle fx simulation applied to them, you can have as many FXgroups in your scene as you need and each will have its unique particle system attach to it. below is the FXGroup attributes in details:
Particles: this section will have the attributes the particles start and end also the size and opacity. very important fundamental behaviours.
3.1- Particle Rate: this attribute will control the rate of the particles emitted per frame.
3.2- Particle Start Size: this attribute will control the size of the sprite particle at birth.
3.3- Particle Size End: this attribute will control the size of the sprite particle toward its death before it will fade away.
3.4- Particle Opacity: this attribute will control the overall opacity of the particles.
3.5- Particle Life: this attribute will control the time of the particle will remain in the scene until they completely disappear, the time will be in seconds.
Wind: this section have the wind attributes that will control the behaviour of the particle fx.
3.6 WStrenght: this attribute will control the intensity of the wind, the intensity will be affected by the scene size, feel free to experiment with the numbers to achieve the desired results.
3.7- WDirection X, Y, Z: this attribute will control the direction of the wind.
Turbulence: this section will add turbulence behaviour on the particle fx, by using this section you can achieve some very cool behaviour on the particles, from wispy smoke to some magic type effects.
3.8- TStrenght: this attribute will control the intensity or magnitude of the turbulence.
3.9- TFrequency: this attribute will control the frequency of the particles, lower value like 0.2 will add more details and motion to the particles and higher value will have less details and more bigger motion, feel free to experiment with this attribute to achieve some cool behaviour.
3.10- TDirection X, Y, Z: this attribute will affect the direction or the phase of the frequency.
3.11- Noise Level: this attribute will add noise type distortion to the turbulence. values are up to 8.
3.12- Noise Strength: this attribute will control the strength and the intensity of the noise distortion.
Retime: this section is responsible for retiming the particle simulation.
3.13- Time: this attribute will control the speed of the particles. when is set to 1 this means the particles will be at the same speed/time of your scene, the higher the value the slower the particles will behave or move.
If you are trying to simulate a particles that are very far away its good idea to experiment with the Time attribute and see which values will work for your desired look.
4- Particle Rotation Speed: this attribute will control the rotation on each sprite while its alive and moving. recommended no more than 15.
Note: make sure you are selecting the desired nParticles before you apply the settings, you can find the nParticle under the FXGroup.
5- Set Rotation On Selection: this button will set the rotation speed on the selected particles. you can re-set the rotation speed anytime and for as many time as you need.
6- Remove FX: this button will remove the particle fx simulation from selected objects.
7- Delete FX: this button will delete the entire particle system from your scene.
Note: if the particles do not render but you still can see them when you press 5 then please make sure to reload the image files in the particles shader.
Troubleshooting
1- After creating the simulation, convert to dynamics – then generate directional explosion or demolition.
Problem: If the sim start on frame 1 and it doesn’t follow the start sim animation that you created on the main sim control.
Solution: Remove the simulation on the objects that are not working (General Settings – Remove Sim From Selected Objects) then close the scene and open it again, select the objects and convert them to dynamics as desired from the menu, then try to key the start sim on the frame you want. sometimes restarting maya help as well.
2- After creating the simulation, convert to dynamics – then generate directional explosion or demolition.
Problem: After keying the sim and worked fine, you decided to change the sim start animation. then after changing the sim animation keys to new time the sim objects suddenly disappears or they go somewhere very far.
Solution: Remove the key frames or animation from the sim start by breaking the connection on the sim start in the channel box or from the graph editor by selecting the keys and deleting them (goto frame 1 and set the Sim Start to 0) after that go to the new desired time where you want the sim to start and key the animation again. this should solve the issue.
On Rare Occasions, if the objects jump too far when the sim start, that could be related to naming conflict. in this case please rename the poly objects using the maya rename tool to anything else, then delete the sim and reapply again. this should fix the issue.
3- After creating the simulation, convert to dynamics – then generate directional explosion or demolition and adding static colliders on objects in the scene.
Problem: The dynamic objects still crashing in the objects even the static collider is applied.
Solution: First select the bulletSolver1 from the outliner and adjust the Internal Fixed Frame Rate from 60Hz to 120Hz this will improve the quality of the calculations.
2nd if this didn’t help, most likely the objects that have static colliders are too thin or complex, you can create simple proxy objects and then convert the proxy objects to static colliders then hide them in the display layer, this will solve the issue and speed up the processing time / reduce the errors.

